If you’d like to learn how to make animated Instagram stories for free, we’ll take you through the basics. You can also use these tips to turn your photos into animated versions in your feed. Here is an overview of what we will cover:
Why video stories are better than photos What software you need for this tutorial How to turn an Instagram photo into a video with music How to turn multiple images into a slideshow style video How to upload to Instagram with hashtags included
Why Are Videos and Animated Stories Better Than Photos?
We’re not sure what Instagram’s exact algorithms are, but video stories seem to perform far better than photo stories. When you add a hashtag in your story, it has a chance to appear in the story feed for that particular hashtag. However, Instagram has some secret scoring system behind the scenes that determines whether your story will be shown or not. In my tests, video stories always have a better chance to get featured than photo stories. This is great news because more featured stories means more impressions and potentially more followers. On top of this, video content is far better at keeping your followers engaged. If you care about making quality content, it makes perfect sense to use this tutorial.
Recommended Free Software for This Tutorial
We suggest using HitFilm Express for this task, but if you have a video editing tool already, you can use that instead. HitFilm Express is a powerful video editing tool and it’s completely free to use, although you can pay for more effects and styles. You must enter an email and create an account to get access to the download link. If you’re apprehensive about getting your hands on a video editing tool for the first time, don’t worry, it’s quite straightforward. I’ll take you through all of the steps needed for this particular tutorial so that you don’t get lost along the way. If you’d like to make more complex animated videos, you may need to use a photo editing tool. You can either opt for a free Photoshop 7 day trial, or use GIMP. In this tutorial, we’ll be using GIMP, a completely free open source image editor.
How to Turn an Instagram Photo Into a Video with Music
Learning how to turn an Instagram photo into a video with music is easily one of the most requested image editing guides I see. We’ll be covering the following steps below.
How to use Hitfilm Express to create an animated video How to make sure the video is the right length (under 15 seconds) How to ensure the video is the right dimensions (9:16) How to source and add music How to add special effects
Step 1: Creating the Photo
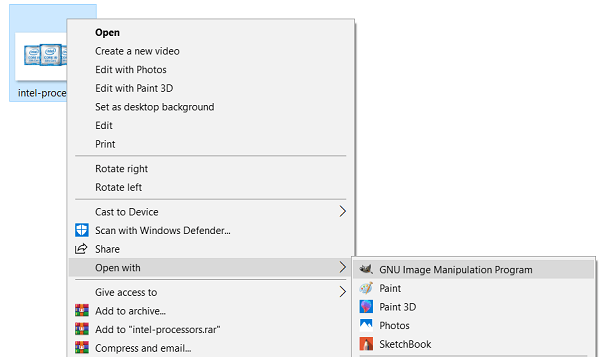
It all starts with picking the photo you’d like to turn into an animated video. For this tutorial we’ll be creating a story to promote our Intel CPU comparison article. You must make sure your photo is the right size and resolution. If it’s already Instagram ready, you can skip this step. For Instagram Stories, the resolution is flipped. So, instead of 1920 x 1080 16:9 it is 1080 x 1920 9:16. In other words, it’s a portrait resolution, not a landscape one. If you are using your own photos, the easiest option is to crop it or just take a photo in portrait mode. When sourcing photos online, you’ll need to edit the dimensions. This can be done in two quick steps. First, take your sourced image and open it in your image editing software.
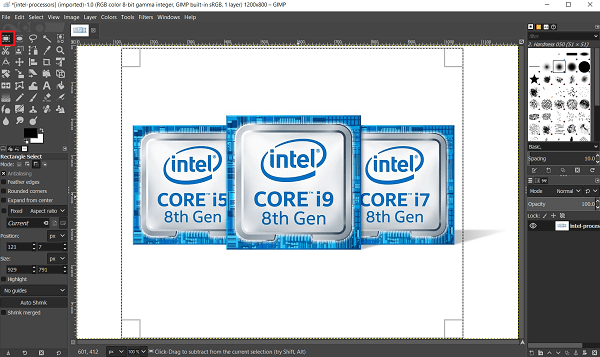
Next, click the image select tool and then click and drag over the main area of the image. You are most likely going to need to crop out the areas on the side.
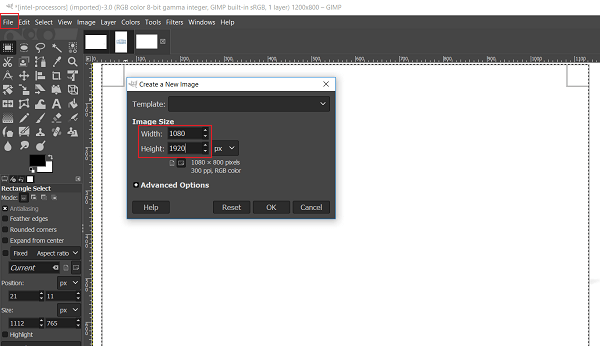
Next, press Ctrl+X. This will cut out the selected area. After, click File at the top left, then New, then set the parameters to 1080 width and 1920 height.
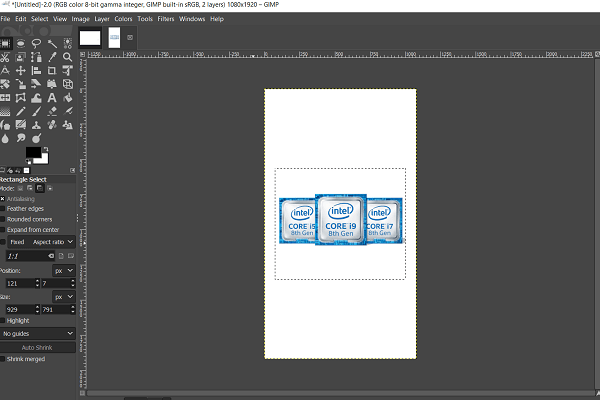
After that, press Ctrl+V – your photo will now be sitting in an appropriately sized area.
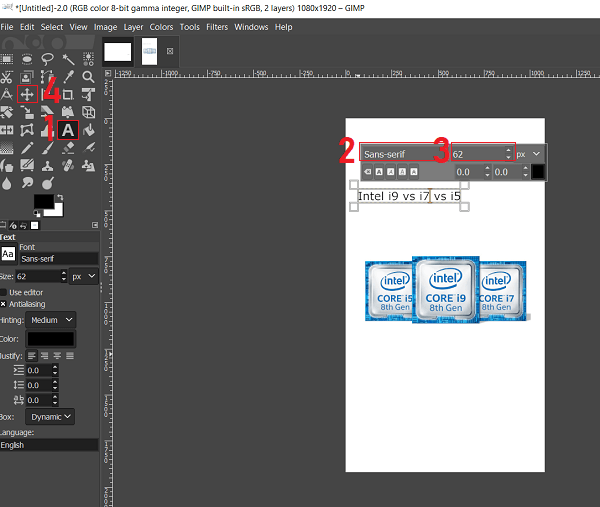
Obviously, there are some problems with this image. There is a lot of empty space above and below the main content. We can fix this by adding two things. The first thing is some text so that followers can get some context. You can use the ‘A’ text tool (1) to add text. Use the box on the right (2) to adjust font size and the box on the far left to change font type (3). The small black square in the corner is for choosing the text color. Once you are finished typing, use the move tool (4) to drag the text box into a more suitable position.
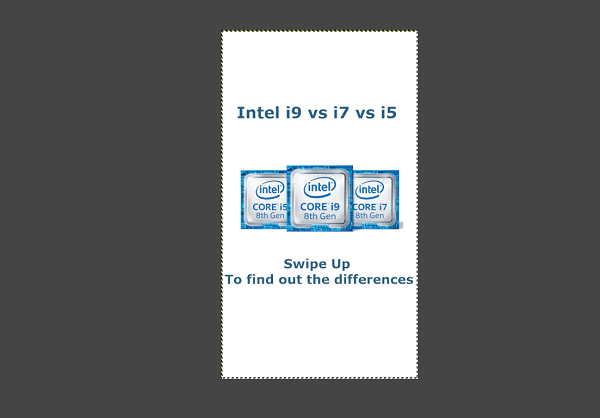
After adding some text, this is the result. It’s much better, but there is still a lot of white space at the top.
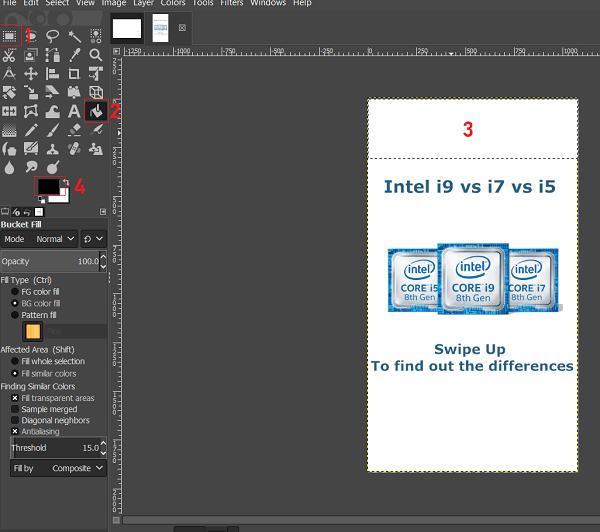
Thankfully, we can resolve this by adding black bars at the top and bottom of the image. It’ll look like the overall image size is smaller on Instagram and we can even hide some hashtags in this area. More on that later. To create black bars, first select the rectangle select tool (1), and then create a rectangle at the top of your image. Afterward select the paint bucket tool (2). Click to fill the area (3). You can use the color select tool (4) to change color if it’s not already on black.
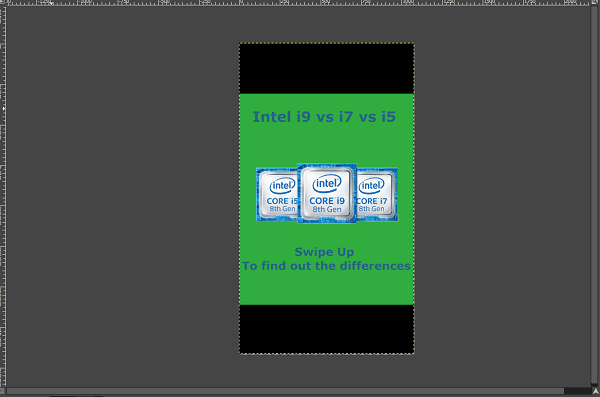
Repeat this process on the bottom. If you’d like, you can use the paint tool on the main white area too to liven the image up a little. After, you should have something that looks little like this.
Now it’s time to save the image and move on. Click File > Export and find a suitable location so that you can find it easily later. When you export, make sure to add .PNG at the end of the file name so that it saves as the right file type.
You now have your image ready for editing.
Step 2: Turning the Photo Into a Video
It’s now time to open up your photo in the Hitfilm Express video editing software. We’ll guide you through every step below. After signing in, click File, then New at the top of the page. On the project settings page, scroll down on the template selector and click Custom. Next, make sure your settings reflect what we have selected below. Finally, click Start Editing.
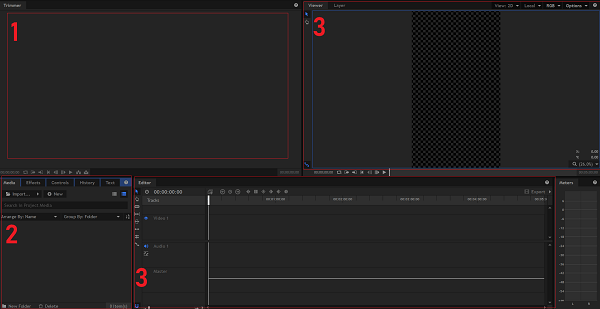
Here is a quick overview of what you are looking at.
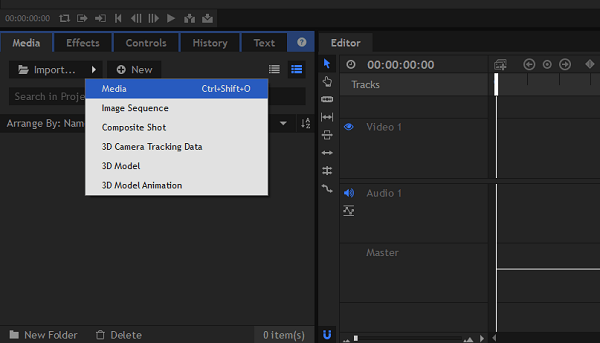
With that explained, let’s get started with the bulk of the tutorial. To begin with, you need to import your photo. In the media and effects panel, click the Import arrow, then click Media.
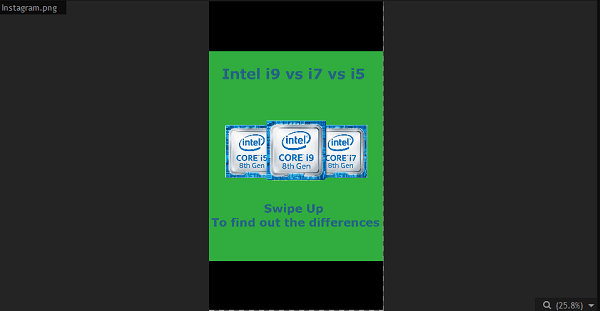
Find your photo and then click to import it. You’ll see something like this.
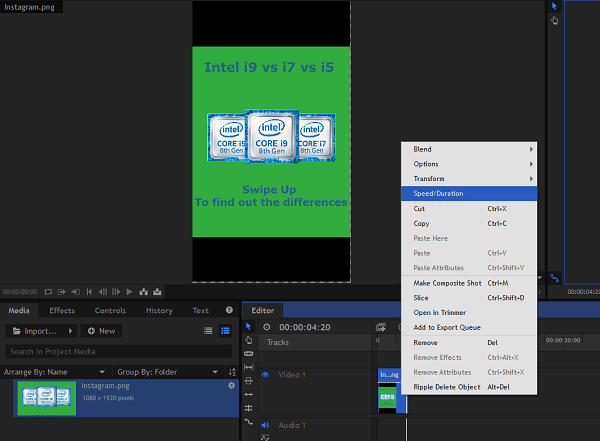
From the media and effects panel, drag your image and place it into the timeline panel. You will now have started the beginning of your video project. Right now, the video should play for roughly 4 seconds by default. We can increase it up to 14 seconds. Instagram stories have a 15 second limit, but if it goes over that time even just by a millisecond, it cannot be used. To change how long your photo plays in the video, right click it in the timeline panel and click Speed/Duration.
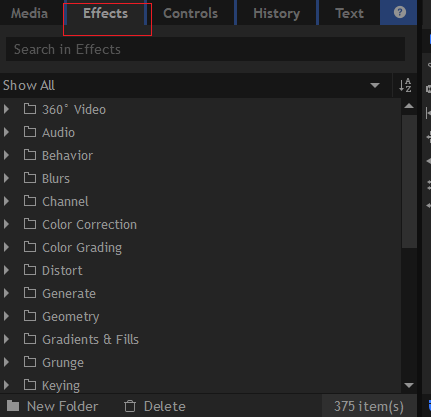
You can adjust the duration option in the Speed/Duration tab to 14 seconds. After, click OK to apply the changes. You will now have your full length Instagram story. Time to add some effects! On the media and effects panel, click the Effects tab. Here is a picture to help guide you.
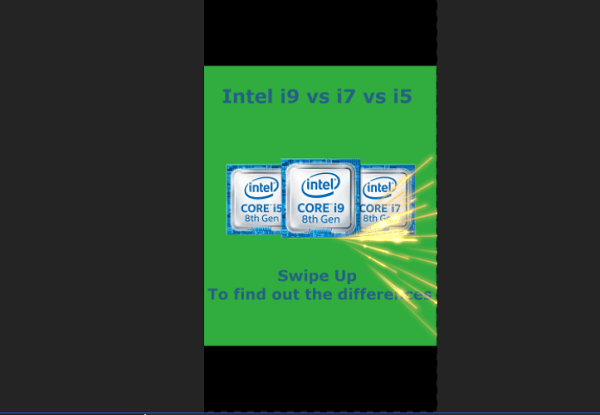
There are many effects you can play around with, most of which are free. To test effects, simply click and drag the effect into your photo in the timeline. After adding an effect, press play and you can view it in the viewer panel. If you don’t like an effect, press Ctrl+Z to undo it. Many of the effects only add a basic filter to your photo, which is a little boring. If you want animated effects, look for effects in the Warp, Grunge, Quick 3D, and Particles & Simulation folders. Here is an example of something we made. It was created using the Sparks effect under the Quick 3D tab. With this effect, it looks like a spark fires out of the processor chip.
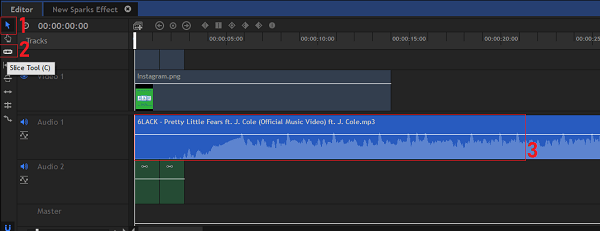
If you would like to add music, you must find .MP3 files or other audio files. There are many free resources online for royalty free music, which should be used if you are running a business. Or, you can use copyrighted material as long as it falls under fair use. You can import music using the same method that you used to import your photo. Once you have imported your music, drag it into the timeline. The audio may be more than 14 seconds, so you’ll need to adjust this. There are two tools in the timeline panel that you can use to accomplish this.
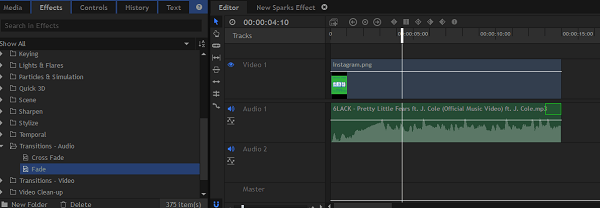
To edit the audio (3) in your timeline, you can use the slice tool (2) to cut the audio into two separate portions. After cutting it, use the move tool (1) to select each portion. You can press ‘delete’ on your keyboard to delete any portion you don’t want. Use the Move tool (1) to click and drag the audio into a new position on the timeline. You may need to listen to the audio to find the best 14 second chunk to use. Here is what your timeline should look like after editing the audio.
If you want the audio to fade out, go to the effects tab on the media and Effects panel. Next, scroll through the effects and find the Transitions – Audio folder. Click to open it. Find the Fade option and click and drag it to the end of your audio clip in the timeline.
How to Add More Images To Your Video
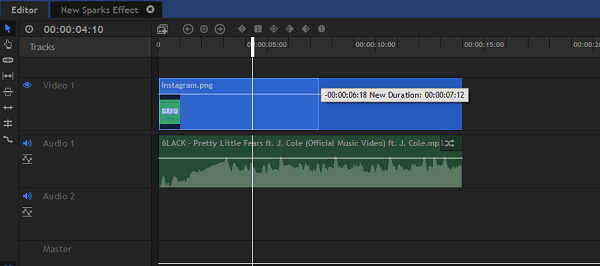
It’s quite easy to make a slideshow style video with Hitfilm Express. With the move tool in the timeline, highlight the end of your photo clip and drag to reduce its size.
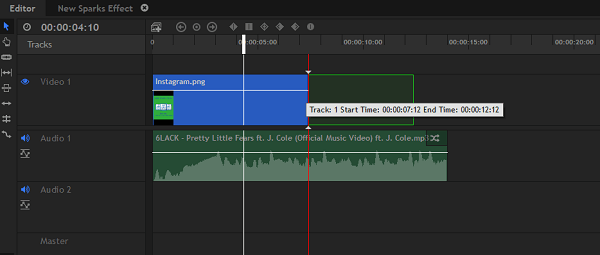
Next, use the import option in the media and effects panel to add more photos. You can even add videos. Click and drag your images and photos to your timeline. As you do this, you’ll see something like shown below. You can use the move tool in the timeline panel to adjust the length of each clip. There is also an effect in the effects tab on the media/effects panel that can be used to fade out each slide.
Exporting Your Video, Ready For Instagram
The next step is to export your new video. To do this, click the Export button on the far right side of the timeline panel. Next, click Contents.
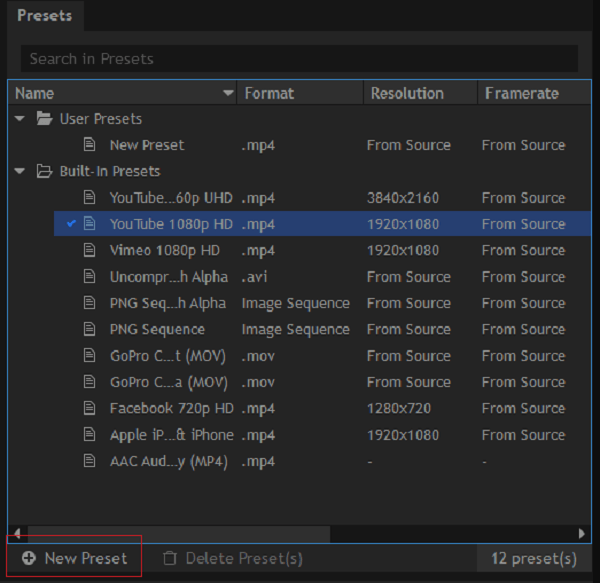
To make sure it fits on Instagram, you will need to make a new custom export preset. Look for the Preset tab on the left side of the screen. On this tab, click New Preset. Next, click MPEG-4 (.mp4).
Follow the settings we have listed below, then click ‘OK’.
Next, divert your eyes to the Queue panel. You’ll find your project ready to export here. Click the dropdown box on the Preset section and choose the preset you have just created. Finally, click the Start Exporting button at the bottom of the Queue panel.
Your video will now begin to export. Once it has exported, you’ll be be given a link in the Output field in the Queue panel. You can click that to find your video on your computer.
Uploading Your New Animated Story To Instagram
Now that we have your video, there are just a few steps left to get it on Instagram. Here is what is left to do.
Transfer your video to your device Add it to your story Add hashtags
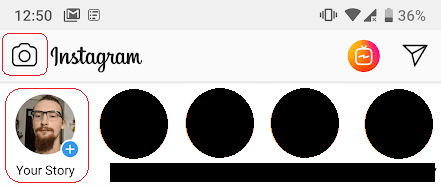
There are a number of methods to transfer your new video to your smartphone. The easiest would be to use a cloud photo app like iCloud on iOS or Google Photos on Android. Alternatively, you can transfer it via USB. Once you have the file on your smartphone, it’s time to upload it to your Instagram account. In Instagram, tap the camera button in the very top left or the Your Story button.
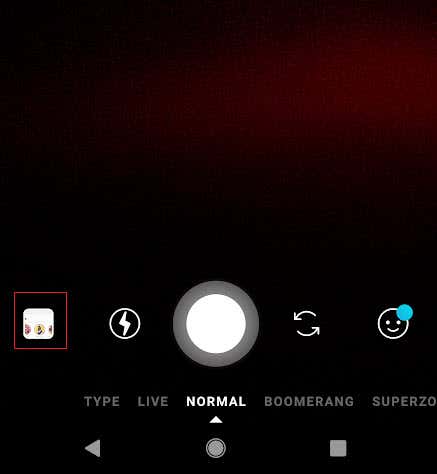
Next, tap the small photo reel button at the bottom left. You can now find and select the video that you created.
You can now go through the normal steps you’d take to submit your story to Instagram. If you’d like to get even more exposure on your new story, you can add up to 10 relevant hashtags. Tap the text button at the top, then type #example. Just replace example with whichever hashtags are the most appropriate. You can change the text color to black and then drag the text into the black area in your story. This lets you include hashtags whilst keeping them hidden.
Conclusion
We hope that our guide on how to make Instagram animated stories has proven to be useful. Do you have any questions about this guide? If so, please feel free to get in touch.
